Water Pressure Reducing Valve Installation

How To Install A Pressure Reducing Valve And Adjust Water Pressure Installation Plumbing Home Repair

Z Tide Group Ztidevalve Twitter Our Stainlesssteel Direct Acting Pressure Reducing Regulator Valves May Installed In Vertic Installation Tide Hydrant

Z Tide Group Ztidevalve Twitter Pressure Reducing Valve Installed Under Outdoor Environment Pr Fire Protection System Fire Protection Installation

Pressure Reducing Valves In Water Work Application Philippines Pressure Control Valve Control Valves Valve

Water Pressure Reducing Valve Valve Pressure Plumbing Valves

Water Tank Installation Water Storage Tanks Water Storage Domestic Water Pumps

If the pressure is excessively high install a pressure reducing valve.
Water pressure reducing valve installation. Take the water pressure reducing valve and attach it to the fittings. If you install a pressure reducing valve before the hose bib branches you will lose your wonderful high pressure. Turn off all the water. Warm up all of these fittings with the soldering torch and then apply some suitable caulking paste to the edges of the fittings.
Using threaded pipe and fittings attach a pressure gauge to each side of the pressure reducing valve. So the home inspector will always recommend getting the valve installed in any home new or old with a psi of 80 or higher. Apply the coupling and put in the adapter. The flux needs to be forced down by the pressure of the water so the valve blocks the flow.
The city code for new home construction states the psi cannot be higher than 80. There are two types of water pressure reducing valves direct acting and pilot operated which use globe or angle style bodies. Take the time necessary to install the extra piping on the high pressure side of your water service line to allow you to keep high pressure at certain fixtures. Remove the pressure gauges and rubber o rings from the valve assembly.
Shut off the water to the house then drain water from the plumbing system. Hoses are a common location. It is best to check this before you have soldered up your pipes. Installed directly after the water meter in homes commercial buildings and manufacturing plants a water pressure reducing valve automatically reduces the pressure from the water supply main to a lower more sensible pressure.
Use a tubing cutter to remove a section of water pipe as indicated by the marks made in step 4. Mount the fitting upon the water pressure reducing valve and then fit this into position. So any new home will have one of these valves installed. For the home inspector this is an issue of liability.

Booster Pump Explain New 2017 Youtube Water Pressure Pump Refrigeration And Air Conditioning Plumbing Tank

Wood Stove Hot Water Google Search Hot Water Home Maintenance Distillation

Pin En Green Business Tips

Piston Design Pilot Operate Pressure Reducing Valve In Fire Protection Pressure Control Valve Fire Protection Sprinkler System

Solenoid Valve On Water Supply Application Which Installed Vertically Compact Design Feature Allows Installer Pressure Control Valve Water Supply Installation

Pressure Reducing Valve Set Model Rs 201 H Built With Strainer And Bypass Line Providing Easy Maintenance And Sav Pressure Control Valve Control Valves Valve
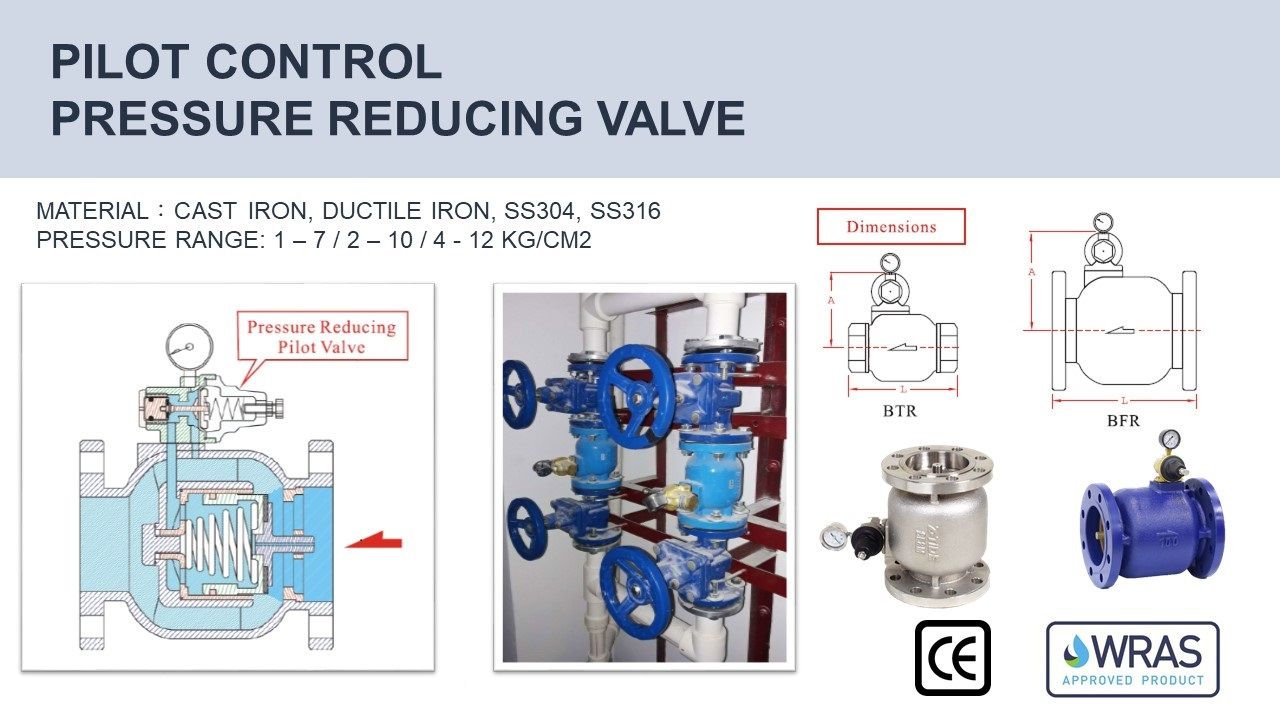
Pilot Control Pressure Reducing Valve Pressure Control Valve Control Valves Valve

Water Pressure Reducing Valves Water Conservation Learn About Watts Canada Water Conservation Valve Water Pipes

Pressure Regulators Pressure Control Valve Control Valves Valve

Low Water Pressure In Your House The Problem May Be The Pressure Reducing Valve In Your Yard We Dug This O Plumbing Pressure Control Valve Low Water Pressure

The Main Role Of The Pressure Reducing Valve Engineering Hydraulic Systems Mechanical Engineering

1 5 Inch Pressure Reducing Regulator Valve On Hydrant Pipeline Bangladesh Pressure Control Valve Control Valves Valve

Z Tide Group Ztidevalve Twitter Pressure Reducing Valve Built On A Mining Pressure Reducing Station Pressu Pressure Control Valve Control Valves Valve

